Whoopie Pies (makes 10)

Whoopie Pies by The Fat Foodie

A while ago I made chocolate bundt cakes to celebrate my 100th blog post and the sponge I made them with was so tasty that I wanted to try making other things with it. I’ve always loved whoopie pies, but sometimes shop-bought whoopie pies can be a bit too sickly because they have too much filling inside them and the quality of the buttercream icing often leaves a lot to be desired. The beauty of baking your own therefore, is that you can control the buttercream icing to baked sponge ratio to suit your own taste.

Although I used a proper whoopie pie tin it’s not completely necessary because you could just use a yorkshire pudding tin or something like it to bake your whoopie pies in. All you’re looking for is something that’ll control the spread of the sponge as it bakes and allow it to rise. In fact, if you don’t mind your whoopies looking a little odd you could even use a traditional fairycake shallow tin to bake them in.

I made my whoopie pies traditional chocolate ones, but you could omit the cocoa powder and make them with other flavours instead, such as vanilla (using 1 tsp vanilla extract), lemon (using the zest of 1 lemon) or bake them as a plain sponge but sandwich them with strawberry jam as well as buttercream icing.

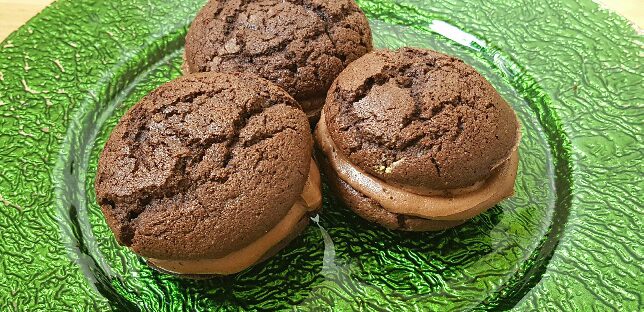
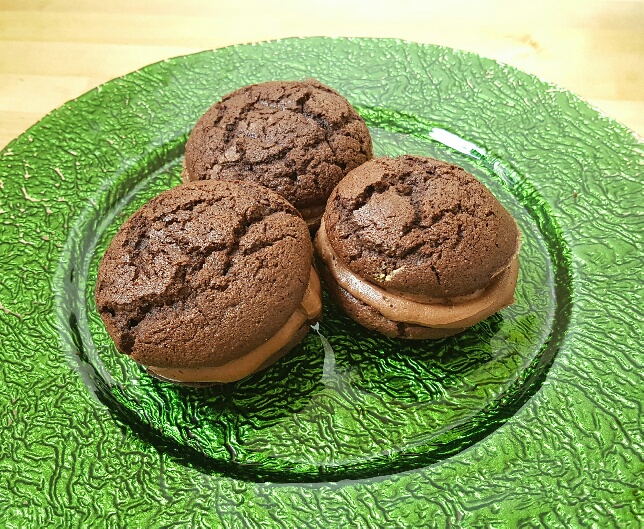
I can highly recommend making the chocolate whoopie pies though because they result in two rich, moist chocolate sponges that are bonded together with a lightly whipped decadent cocoa buttercream, creating the perfect cake for one. One whoopie pie is a low FODMAP portion, but stopping at only eating one is a different matter entirely though.

Ingredients:

220g dark brown sugar
120g fine polenta
50g gluten-free flour (I use Dove’s Farm G/F flour because it’s made with low FODMAP ingredients whereas many other gluten-free flours are made with high FODMAP options.)
90g ground almonds
50g cocoa powder
A pinch of salt
2 tsps baking powder
1/2 tsp of bicarbonate of soda
120g butter (or dairy-free version)
100g coconut oil (melted)
4 eggs
60ml rice milk
For the buttercream:
150g butter (or dairy-free version)
170g icing sugar
30g cocoa
1 tbsp rice milk

Method:

Preheat your oven to 180C/160C Fan/350F/Gas mark 4.

Lay out your whoopie pie tins and give them a light greasing before dusting them with flour.

Measure all of the wet ingredients into a mixing bowl.

Measure all of the dry ingredients into another bowl and give it a stir.

Add the dry ingredients into the wet ingredients and mix well.

Pour equal amounts of the cake mix into the whoopie pie tins.

Bake in the oven for around 10-12 mins. (They’re cooked if a skewer pushed into the middle of a couple of the cakes comes out entirely clean.)

Leave to cool on a cooling rack before taking the whoopie pies out of the tin.

Place your buttercream ingredients in a large mixing bowl and whisk together.

Once cool, sandwich the whoopie pies with the buttercream icing.

Whoopie Pies by The Fat Foodie

Digiprove sealCopyright protected by Digiprove © 2017-2018

Free-From Custard Creams

Free-From Custard Creams

When I first went gluten-free and dairy-free one of the free-from products that astonished me at their cost was biscuits. I mean, £3 for a Genius gluten-free loaf from Sainsbury’s is ridiculous, but £1.80 for 8 chocolate chip biscuits from the Sainsbury’s free-from range is just obscene. I know you’re paying for the convenience factor, but fresh biscuits cost next to nothing to make at home so I felt really cheated and ripped off at the cost of free-from versions from a number of shops.

These free-from custard creams are so cheap to make (I’d estimate that a batch of around 12 custard creams cost considerably less than £1 to produce) and they’re really easy to whip up in a hurry. I just measure all of my ingredients into a plastic jug and use an electric whisk to blend it together into a biscuit dough. You don’t even need to roll out the dough and cut them out because you just roll them up in your palms and flatten them out on the baking tray. You can’t get any easier, can you?

I normally sandwich my custard creams with buttercream icing, but these have a little bit more caster sugar in them than my standard custard cream recipe so they’re really nice plain without a filling, but by all means sandwich them if you like. My buttercream recipe can be found here and you can just use dairy-free butter to keep the mix free-from. Equally, you could drizzle melted chocolate over the top of them or icing sugar.

Whether you decide to use the filling or use a sweet drizzle over the top of the biscuits, they’ll still save you a huge amount of money compared to buying them ready made in a shop.

Ingredients:

70g dairy-free butter (or normal butter)

30g coconut oil

80g gluten-free flour (I use Dove’s Farm G/F flour because it’s made with low FODMAP ingredients whereas many other gluten-free flours are made with high FODMAP options.)

20g cornflour

50g custard powder

70g caster sugar

1/2 tsp vanilla extract

1 tsp xanthan gum

Method:

Preheat your oven to 200C/180C Fan/400F/Gas mark 6.

Measure all of your ingredients into a plastic jug and then mix it all together with an electric whisk.

Lay greaseproof paper out onto two baking trays.

Take small handfulls of custard cream dough and roll into a ball before flattening between your palms and placing them on the baking trays. Continue until the mix is all used up.

Press the tines of a fork onto the top of each biscuit to create the distinctive mark of a custard cream and bake in the oven for 12 to 15 mins or until they are golden brown.

Free-From Custard Creams About to be Baked

Remove from the oven and leave to cool on a cooling rack.

Once cold you can sandwich them with buttercream icing or drizzle with a topping if you like.

Freshly Baked Free-From Custard Creams

Free-From Custard Creams

Digiprove sealCopyright protected by Digiprove © 2017

Chocolate Orange Biscuits

Chocolate Orange Biscuits by The Fat Foodie

After giving it a great deal of thought I feel ready to announce that I’ve came to the conclusion that I definitely prefer biscuits over cake. I know it’s bold and don’t get me wrong, I love a slice of good cake, but there’s that lovely unbeatable crunch that is present in a decent biscuit that is lacking in cake (unless it’s a terribly baked one!).

One of my standby baking ingredients at the moment is dark chocolate because it’s naturally dairy-free and FODMAP friendly. I think it lends itself to being used as a biscuit topping because it’s really easy to use and the flavour complements so many different types of biscuit. In my mind, one of the best partnerships in the sweet area of the culinary world is that of chocolate and orange, with the dark, rich silkiness of the chocolate providing a wonderful counterfoil to the fresh zestiness of the orange oil. Divine.

This chocolate orange biscuit recipe is really quick and easy to make and produces little crispy biscuits that are a doddle to top with melted chocolate. The inclusion of custard powder and a little bit of cornflour ensures that they have a good crunch, but still have a bit of crumble to them. I used a triangular cookie cutter which gave great results, but you can cut them out into any shape you like.

The real struggle lies in waiting for the dark chocolate to cool and harden on the biscuits before you eat them. I’ll bet you can’t.

Ingredients:

70g butter (or dairy-free version)

30g coconut oil

80g gluten-free flour (I use Dove’s Farm G/F Plain Flour)

20g cornflour

50g custard powder

70g caster sugar

The grated zest of 1 orange

1/2 tsp vanilla extract

1 tsp orange flavouring

1 tsp orange juice

1 tsp xanthan gum

1/2 tsp baking powder

200g dark chocolate (for the topping)

Method:

Preheat your oven to 200C/180C Fan/400F/Gas mark 6.

Line two baking trays with greaseproof paper.

Melt the coconut oil and butter in a microwavable bowl.

Add all of the other ingredients and mix until a smooth dough is formed.

Chocolate Orange Biscuit Dough

Roll out the dough onto a floured work surface and use the triangular cookie cutter to cut your biscuits out and place them on the baking trays.

Chocolate Orange Biscuit Dough

Chocolate Orange Biscuits About to be Baked by The Fat Foodie

Bake the biscuits in the oven for 12 to 15 mins, or until they are golden brown.

Remove from the oven and leave to cool completely on a cooling rack.

Freshly Baked Chocolate Orange Biscuits by The Fat Foodie

Once the cookies are cold, melt the dark chocolate in a bowl in the microwave (stirring very frequently so that the chocolate doesn’t burn).

Generously spread the chocolate over the cookies and leave to harden before serving. Or dive right in and get your chin and fingers covered in melted chocolate. It didn’t happen to me, you understand, it was a friend one time…

Chocolate Orange Biscuits by The Fat Foodie

Chocolate Orange Biscuits by The Fat Foodie

Digiprove sealCopyright protected by Digiprove © 2017

Free-From Lasagne (serves 4-6)

Free From Lasagne by The Fat Foodie

Everyone loves lasagne, it’s just one of those universally adored dishes that Italy’s renowned for. However, when I went dairy-free and onto the low FODMAP diet I was concerned that it would be off the cards because it normally has lots of onion, garlic and cheese in it, but I made a conscious effort to adapt my usual lasagne recipe into a FODMAP friendly one and it seemed to have been successful.

When I started looking into the FODMAP diet and for ways to incorporate onion and garlic flavours into my cooking I discovered that you can use chives without it having any impact on your IBS and that garlic-infused oil is fine to use too, as long as you don’t consume the actual garlic itself. During my onion-based investigations though (forgive me, I’ve been reading a lot of old-school crime novels lately), I also found out that there is an Indian spice called asafoetida which mimics the flavour of onion. I was pretty sceptical to be honest, but I ordered some asafoetida online and was thrilled to find out that it genuinely does taste like onion!

Now, you’ve got to be careful when buying asafoetida because some of the spice mixes are blended with gluten flours to make it less potent (it’s a very strong spice), but there are some, such as this one, which are blended with other spices like ground fenugreek instead.

I’d really recommend trying asafoetida if you’re on the low FODMAP diet and you ordinarily enjoy onion and garlic flavours in your cooking because it definitely does what it says on the tin. As a result, my lasagne sheets were layered between a rich, thick, onion-infused meaty ragù that was just as satisfying as the standard version. This free-from lasagne is also topped with a creamy, cheesy dairy-free white sauce that definitely doesn’t make you feel like you’re missing out on dairy (although if you’re not dairy-free you could just use a couple of sachets of cheese sauce mix instead).

I served the free-from lasagne with a fresh green salad that was liberally dotted with fat, plump little jewel-green caperberries whose piquancy cut through the richness of the lasagne and added a tart freshness to the dish, but feel free to just serve it with chips if you’d prefer. You’ll find no judgement here from me, my friends.

Ingredients for the pork ragù:

450g pork mince (use beef if you’d prefer)

200g red bell pepper (diced)

1 tbsp olive oil

2 tsps dried oregano

360g of tinned chopped tomatoes

1 tsp salt

1 tsp asafoetida

Gluten-free lasagne sheets

Dairy-free cheese for lasagne topping

For the white sauce:

25g dairy-free butter

25g gluten-free flour

1/2 tsp ground black pepper

2 tbsps Engevita

200ml rice milk

Preheat your oven to 190C/170C Fan/375F/ Gas mark 5.

Method to make the ragù:

Put the pork mince in a saucepan with 1 tbsp olive oil and cook until done.

Add the red peppers, oregano, salt, asafoetida, chopped tomatoes and tomato puree and cook until hot.

To make the white sauce: melt the butter in a saucepan over a medium heat before whisking in the flour, black pepper and Engevita.

Slowly add a little rice milk at a time, stirring continuously, so that eventually a thick sauce is created. (Don’t panic if it looks really lumpy, just keep stirring and adding more milk and it’ll come together.)

Once the white sauce is thick take it off the heat .

Take a rectangular casserole dish and put a layer of ragù on the bottom and top it with lasagne sheets. Repeat until you’ve used up all of the ragù.

Whisk the egg thoroughly into the white sauce mixture, pour on top of the lasagne, top with the dairy-free cheese and bake in the oven for around 45 mins.

Serve with a salad (and/or chips!).

Free From Lasagne by The Fat Foodie

Digiprove sealCopyright protected by Digiprove © 2017-2019