Chicken Enchiladas (Serves 4)

Chicken Enchiladas by The Fat Foodie

I love Mexican food, but I must admit that I do tend to stick to making the same meals all the time simply because they’re so tasty. I don’t think it’s necessarily a bad thing though because it means that you can perfect your own version until the seasoning mix is just right. That’s the case with these chicken enchiladas.

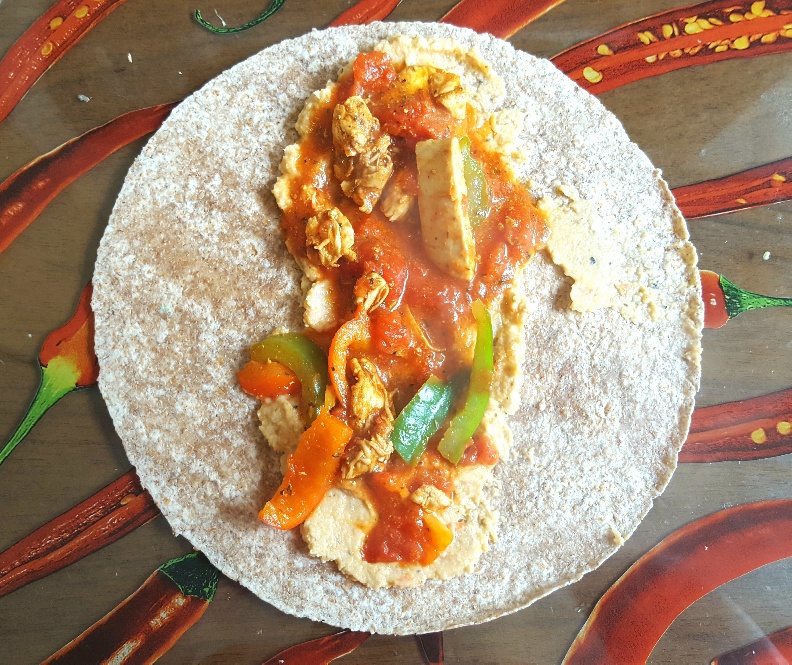
I didn’t realise until I started reading into Mexican food that the word ‘enchilada’ simply means ‘to season with chilli’ and that, traditionally, enchiladas are quite simple  snacks, involving little more than a fried tortilla that’s wrapped around a plain, spiceless filling of meat, beans or vegetables (or a combination of the three).

According to Mexican food expert Diana Kennedy’s quintessential book on the subject of Mexican cookery The Essential Cuisines of Mexico, traditional enchiladas served on the streets of Mexico tend to see their tortillas fried in oil before being stuffed, but I don’t really think that’s necessary when you’re cooking at home. I don’t really like oily food so I’m quite happy to skip that step towards authenticity. Plus you’ve got a grated cheese topping that’s going to add oil to the enchiladas anyway.

Although a traditional enchilada doesn’t contain any spices other than freshly chopped chilli, I like to flavour mine with cumin, oregano and smoked paprika because it makes the whole dish much tastier. As a result, this chicken enchilada recipe yields a large casserole dish filled to the brim with soft tortillas that are stuffed full of delicately spiced tender chicken strips and slices of sweet bell peppers and is topped with a tangy tomato sauce and encrusted with golden grilled cheese. It’s simply the perfect Mexican meal.

Ingredients for the enchilada filling:

8 corn tortillas (or gluten-free tortillas)

1 tbsp of vegetable oil

180g of tinned chopped tomatoes

4 chicken breasts (cut into thin slices)

100g green bell pepper (cut into thin slices)

100g red bell pepper (cut into thin slices)

2 tsps ground cumin

2 tsps dried oregano

2 tsps smoked paprika

1 tsp asafoetida powder

Ingredients for the enchilada topping:

180g of tinned chopped tomatoes

1 tsp asafoetida powder

1 tsp dried oregano

150g grated cheddar cheese (or non-dairy alternative)

Method:

Preheat your oven to 200C/180C Fan/400F/Gas mark 6.

Get a large rectangular casserole dish out to cook the enchiladas in and keep it to one side.

Place a saucepan over a medium heat and add the oil, sliced chicken breasts and spices. Fry until the chicken is almost cooked.

Add the sliced peppers and continue to cook until the chicken is fully cooked.

Add a tin of chopped tomatoes and cook until hot.

Pour the other tin of chopped tomatoes into a jug and add the sauce spices and stir.

Lay a tortilla out on a chopping board and place some enchilada filling inside it before wrapping it up and laying it in a large rectangular casserole dish. (Bear in mind you’ve got 8 tortillas to fill so try to distribute the filling evenly between them.)

Chicken Enchiladas Being Filled by The Fat Foodie

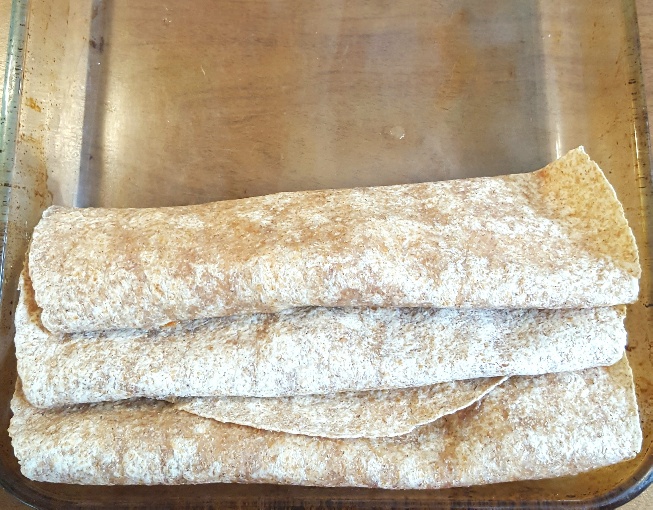
Chicken Enchiladas Awaiting Their Topping

Once you’ve filled all the tortillas and they’re in the casserole dish, pour the enchilada sauce over them and top with the grated cheese.

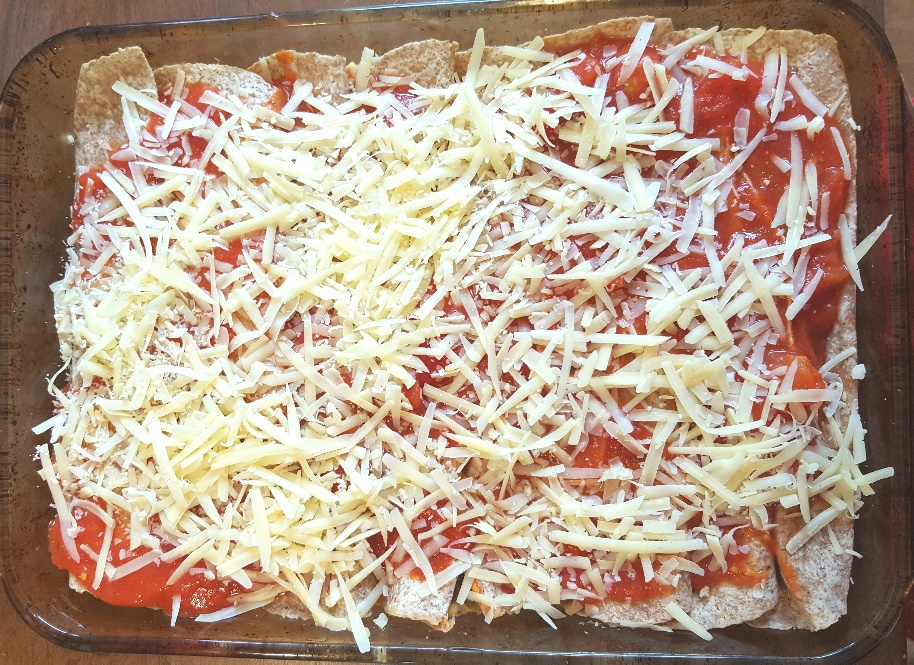
Chicken Enchiladas by The Fat Foodie About to be Baked

Bake in the oven for about 30-40 mins or until the cheese is crisp and golden brown.

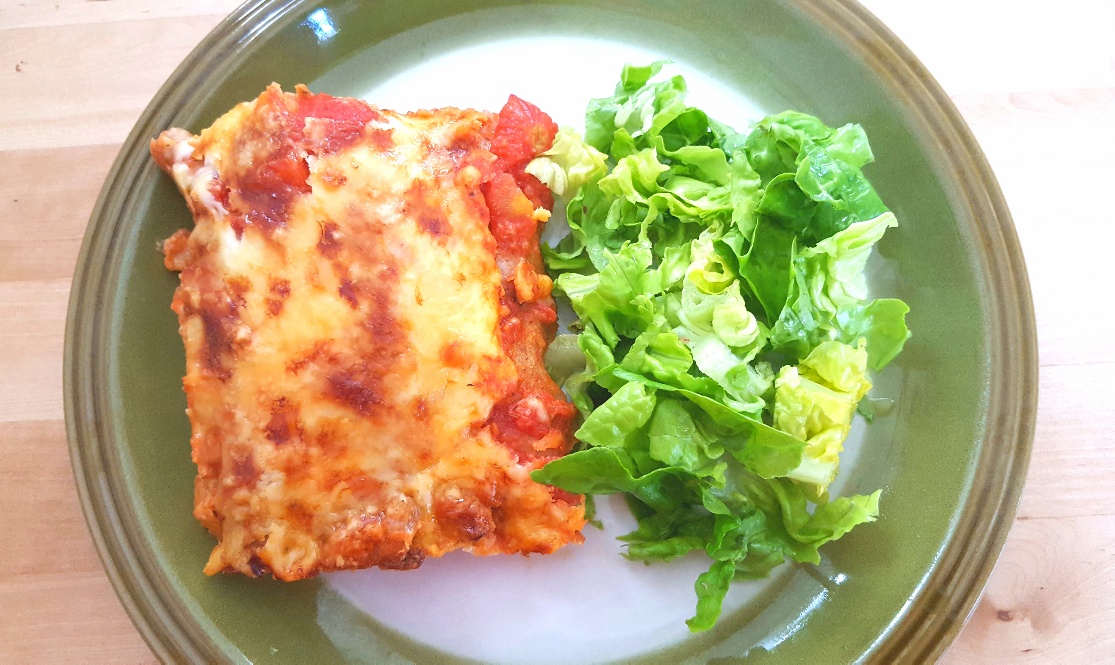
Serve with a fresh green salad.

Chicken Enchiladas by The Fat Foodie

Digiprove sealCopyright protected by Digiprove © 2017

Slow Cooker Whole Chicken

Slow Cooker Whole Chicken by The Fat Foodie

The last time I went shopping I bought a reduced whole chicken, but when I got home I realised that I’d forgotten that I was working the following day and wouldn’t have time to cook it. Now, I’ve read before that you can cook a whole chicken in a slow cooker, but I’ve never tried it because I wasn’t sure what the results would be like. So, I figured it’d be as good a time as any to try it!

I decided to make a base layer trivet of new potatoes and carrots so that the bottom of the chicken would be protected from the heat of the slow cooker and this worked out well because the cooked potatoes and carrots went really nicely with the cooked chicken. In terms of size, my slow cooker is a 3.5 litre one and it fitted the chicken perfectly, but it wouldn’t be a problem if you had a larger slow cooker. I was a bit of a scaredy cat and added a bit of hot water into the slow cooker in case it ran dry, but to be honest I don’t think it was necessary because the chicken naturally released enough liquid and oil throughout the cooking process that it would not have been in danger of drying out at all.

The slow cooker whole chicken was a triumph and is an experiment that I’ll happily remake soon in the future. Although it didn’t have that flavour that is unique to a roast chicken, when I went to take the chicken out of the slow cooker the meat was so tender that it simply fell off the bone and it was complemented by the lovely soft new potatoes and sweet carrots. I had intended on serving it with gravy, but we ended up just having it with sharp, vinegary pickles, salty capers and sinus-burningly hot creamed horseradish. All in all, it was a delicious dinner to greet me after a long day at work and I’ll definitely be making this slow cooker whole chicken again.

Ingredients:

1 whole chicken

New potatoes (enough for however many people you’re feeding)

Carrots (enough for however many people you’re feeding and peeled & cut into large pieces)

Method:

Put your slow cooker on low and put your carrots and potatoes in the bottom.

The Base Vegetables For Slow Cooker Whole Chicken by The Fat Foodie

Place the whole chicken on top and let the slow cooker cook throughout the day.

Slow Cooker Whole Chicken Ready to be Baked by The Fat Foodie

Remove from the slow cooker and serve.

Slow Cooker Whole Chicken by The Fat Foodie

Digiprove sealCopyright protected by Digiprove © 2017

Chicken and Leek Pie (serves 4-6)

Chicken and Leek Pie by The Fat Foodie

Chicken and Leek Pie by The Fat Foodie

On Saturday I roasted a whole chicken, but I always forget just how much meat comes off a bird and, as a result, there was loads left over. This is never a bad thing in my book though because it meant that I could put the chicken towards, not only chicken salad sandwiches for lunches, but also a meal for last night. That dinner turned out to be a chicken and leek pie.

Whenever I roast meat, be it a chicken, a piece of steak or a pork chop, I always let it rest for a good while before serving it. I’ve never encountered a better piece of advice for cooking meat than to let it rest for a little while after it’s been cooked. This process is essential because it allows the fibres of the meat to relax after it’s been in contact with the extreme heat of the cooking process. Think of how your muscles would tense up if you stepped naked into a blast freezer – it’s the same principle for meat when it meets heat. And it’s naked too. So giving it a wee while to relax a bit after going through the cooking experience makes sense really, doesn’t it? And if you cover the meat with tin foil while it’s resting it’ll retain its heat, so it’s not stone cold when you come to serve it.

If it wasn’t for the fact that I had some frozen ready-rolled gluten-free shortcrust pastry in my freezer I might not have decided to make the chicken and leek pie (sometimes making your own pastry can be such a tedious business), but the frozen pastry works very well and doesn’t taste any different, so why not buy it ready-made is what I say.

I gently fried my chopped green leek tops in a little bit of non-dairy butter which added a lovely natural onion-like sweetness, but didn’t add the FODMAPs that come with actually using onions, and then added the half tub of non-dairy soft cream cheese and half pot of oat cream that were needing used up and the results were fantastic. It produced a really light, but rich creamy sauce which enveloped the generous chunks of tender chicken breast and ensured it did not dry out when the pie was being baked.

This recipe makes a beautifully crisp and generously deep-filled chicken and leek pie. And if you have the time and inclination to make it, it will ensure that the people you serve it to will be your most loyal friends for life.

Ingredients:

A 320g pack of ready-rolled gluten-free shortcrust pastry

100g green leek tips (thinly sliced) – only the green tips are low FODMAP

1 tbsp butter (or a non-dairy version)

2 chicken stock pots

1/2 tsp of dried rosemary

1/2 a tub of non-dairy or lactose-free soft cheese

200ml oat cream (or lactose-free single cream)

Cooked chicken chopped into generously sized chunks (I used about 2 breasts and a leg’s worth of chicken)

Rice milk (if needed to loosen the sauce up a little, but you can use your own judgement here)

Method:

Preheat your oven to 200°C, 400°F, gas mark 6.

Grease and flour (or line with greaseproof paper) a pie tin. (I used this size.)

Unroll the pastry and cut out enough to line the bottom and sides of the pie tin.

Place the pastry in the tin, ensuring that it comes all the way up the sides. If you have baking beans then weigh your pastry down with them, if not, just do without. Put the pastry in the oven and bake until the pastry is golden brown (mine took about 15 mins in a fan oven). Take it out of the oven and leave it to cool.

Meanwhile, put your sliced leek and butter in a large saucepan and cook on a medium heat, stirring occasionally, until the leek is soft.

Add the soft cheese, oat cream, petit pois, 2 stock pots and rosemary and simmer until the stock pots have dissolved and the sauce is nice and thick. Feel free to add a bit of rice milk if you feel the sauce is too thick.

Add the cooked chicken chunks to the sauce and gently stir. The chicken absorbed a lot of the sauce when I made it, so if you think you need more sauce then add a bit more milk.

Once you’re happy with the consistency of the pie filling, put it into your cooked pie case.

Chicken and Leek Pie by The Fat Foodie

Chicken and Leek Pie by The Fat Foodie

Roll out the remaining pastry to form a lid for your pie. Don’t worry if there’s not enough pastry to totally cover it, it’s not the end of the world to have an open-lidded or partially-lidded pie and trust me, it’ll still taste awesome (which is the main thing).

Once your lid’s on, put the pie in the oven and bake it until the lid’s golden brown.

Chicken and Leek Pie by The Fat Foodie

Chicken and Leek Pie by The Fat Foodie

We enjoyed our pie simply served with broccoli, but you could add mashed or roasted potatoes and carrots if you wanted the pie to stretch further. It was delicious and there wasn’t a soggy pie bottom in sight!

Save

Save

Digiprove sealCopyright protected by Digiprove © 2016