Hummingbird Cake (serves 8-10)

Hummingbird Cake by The Fat Foodie

Hummingbird Cake by The Fat Foodie

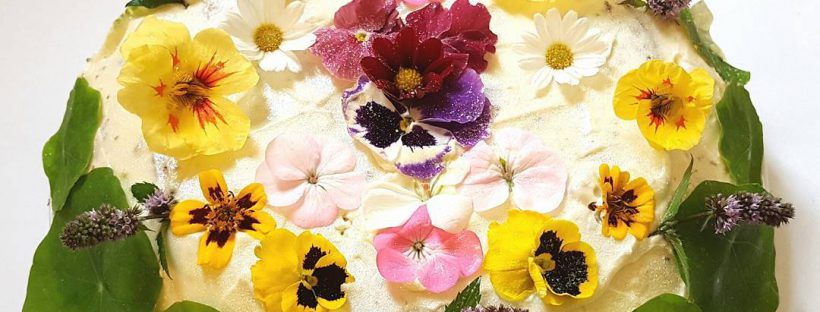
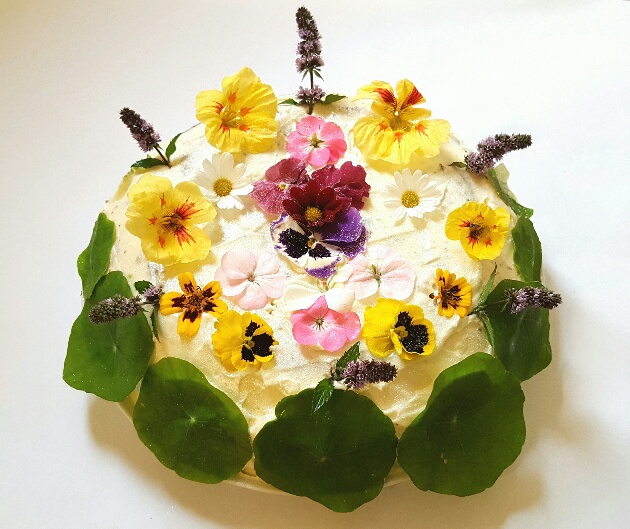
My Canadian aunt recently tagged me in a Southern Living recipe video on Facebook which demonstrated how to make a hummingbird cake and I have been tempted to bake it ever since. (You’ll find the video at the bottom of this post.) A few days ago I went down to my Mum’s house for breakfast and we had been talking about how her summer plants were starting to die back, with only a few bedding plants still alive here and there, so I decided to steal some of the remaining blooms to decorate a cake in celebration of her garden this summer. (*For a list of edible British flowers see below.) The cake I eventually decided to grace with the thoughtfully-picked flowers was the hummingbird cake.

I find that a lot of American recipes fail to work well for me and I attribute this to the fact that instead of using precise measurements they only work on the cup system. That’s fine, but good baking is dependent upon a chemical reaction taking place within the mixture as it cooks and, like any chemistry, if your quantities are inaccurate then you won’t be able to produce the correct result.

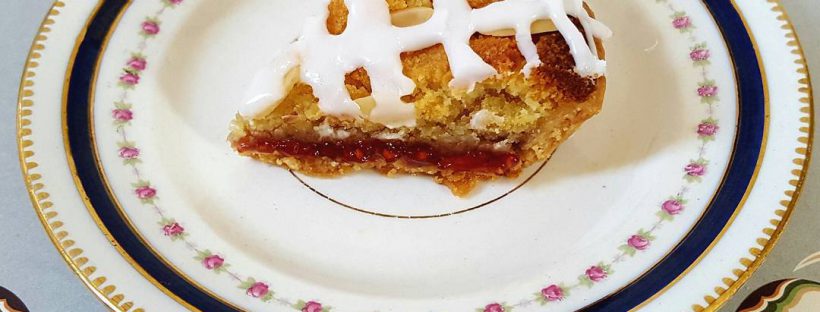
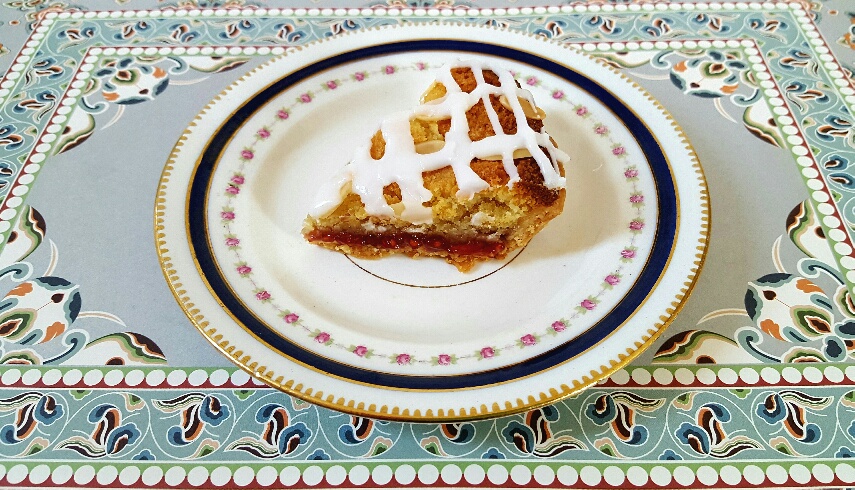
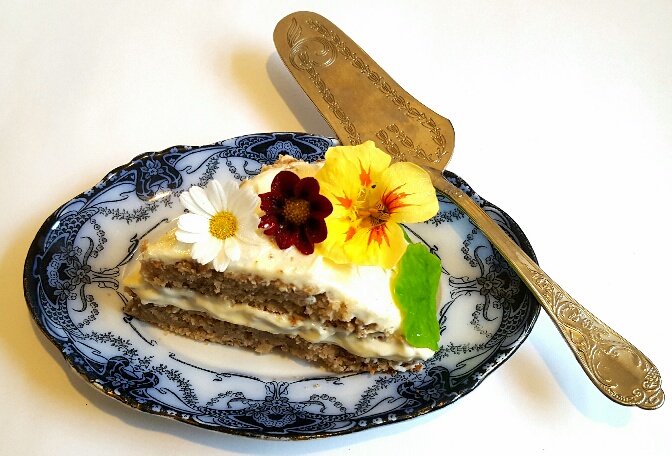
I made the hummingbird cake exactly as the recipe stipulated and everyone who tasted it (about eight people) really enjoyed it. However, I must admit that I personally found it a bit heavy. The frosting’s to die for, it tastes exactly like really good vanilla ice-cream, but the cake itself was just a bit too dense for my tastes. Although, that ratio works out at 8 who enjoyed it to 1 who didn’t, so maybe it’s my taste buds which are wrong.

If I were to make it again I would put less fruit in to try to make it lighter or I’d keep the fruit but add a more generous amount of baking powder. Don’t get me wrong, this recipe makes a beautifully moist hummingbird cake which tastes like a really good banana and pecan loaf, but give it a go yourself and see what you think. After all, eight people can’t be wrong.

Hummingbird Cake by The Fat Foodie

Hummingbird Cake by The Fat Foodie

Ingredients:

For the cake:

120g of crushed fresh pineapple

2 cups of chopped firm bananas

100g of chopped pecans

3 cups of gluten-free self-raising flour (I use Dove’s Farm G/F flour because it’s made with low FODMAP ingredients whereas many other gluten-free flours are made with high FODMAP options.)

1 ½ cups of vegetable oil

2 cups of sugar

1 tsp salt

1 tsp baking powder

1 tsp ground cinnamon

3 large eggs

1 ½ tsps. vanilla extract

For the icing:

225g (8oz) lactose-free soft cream cheese (or a non-dairy version)

1 cup of soft butter (or non-dairy)

450g (16oz) of icing sugar

2 tsps. vanilla extract

To decorate:

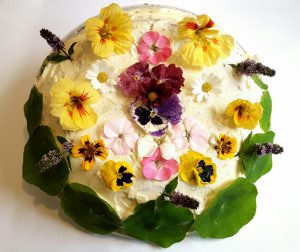
Edible flower heads you’ve shamelessly plundered from your Mum’s garden. (*For a list of edible British flowers see below.)

Method:

This is one of those ‘chuck all the ingredients into a bowl and whisk it all together’ cakes. (I love those ones, don’t you?)

Preheat your oven to 180°C/160°C Fan/350°F/gas mark 4.

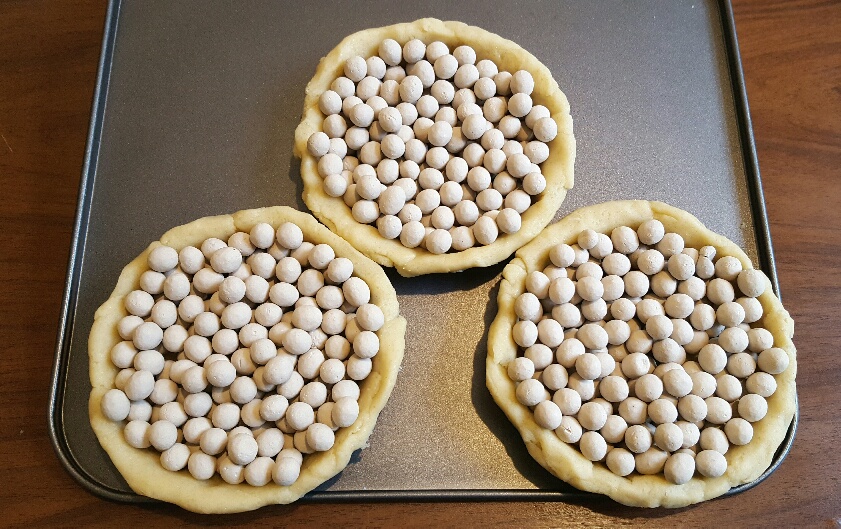
This recipe makes quite a big cake so you’ll need to line three baking tins with greaseproof paper. (You could just use two large tins if you don’t have three that are the same size, but you’ll need to cook the cakes for longer.)

Prepare your ingredients as directed.

Put all of your wet ingredients into a large mixing bowl, including the fruit.

Add your dry ingredients and whisk together.

Pour into the baking tins and put in the oven.

Bake for 25 to 30 minutes or until a skewer pushed into the middle of the cakes comes out clean.

Leave to cool completely on a cooling rack.

While they are cooling make your icing by putting all of the icing ingredients together in a big bowl and whisking together until it’s light and fluffy.

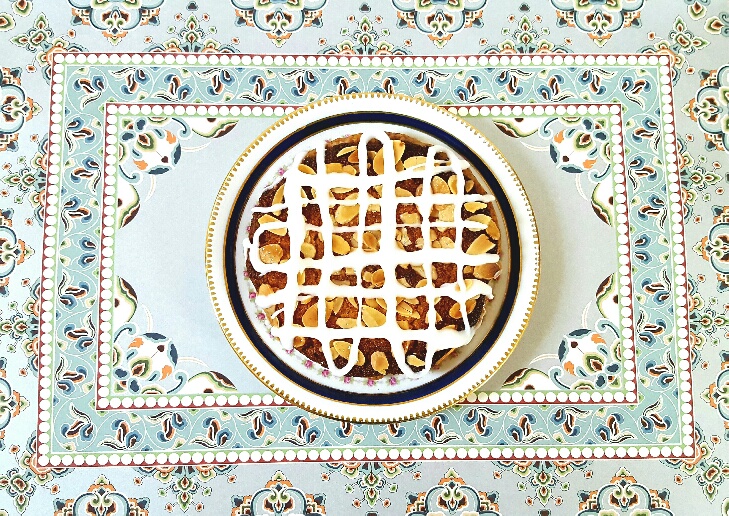
Once your cakes are cool sandwich them together with some of the icing and then use the rest to ice the top and (if you’ve enough left over) the sides.

Decorate the cake with whole pecans or flowers*.

(*Here is a list of edible British flowers. I only used my flowers to decorate the cake, I picked them off afterwards and we ate the cake without them. If you choose to consume these plants and their flowers you do so entirely at your own risk, so unless you’re absolutely sure about what you’re picking then don’t eat them. You can find a very good list of edible flowers and instructions on what parts of the plants you can eat from Thompson and Morgan here.

Edible flowers: Alpine pinks; Apple blossom; Basil flowers; Begonia;  Bergamot; Borage flowers; Broccoli flowers; Busy Lizzie; Carnation, Dianthus and Pinks; Catmint; Chicory; Chive blossoms; Clover; Coriander flowers; Cornflower;  Courgette or Marrow flowers; Daisy; Dill flowers; Elderflower; Evening Primrose; Fennel flowers; Fuchsia; Scented Geraniums; Gladiolus; Hibiscus; Hollyhock; Hyssop; Kale flowers; Lavender; Lemon Balm flowers; Lilac; Mint leaves and flowers; Nasturtium; Marigold; Oregano flowers; Garden Vegetable Pea flowers, but not sweet pea flowers because they are toxic; Primrose, Cowslip and Primula; Rose; Rosemary flowers; Runner Bean; Pansies; Pumpkin and Squash flowers; Rocket flowers; Roses; Sage flowers; Strawberry flowers; Sunflower; Sweet violet; Tulips; Viola.)

Save

Save

Hummingbird Cake by The Fat Foodie

Hummingbird Cake by The Fat Foodie

Save

Save

Save

Save

Save

Save

Save

Save

Save

Save

Save

Save

Save

Save

Save

Digiprove sealCopyright protected by Digiprove © 2016

Raspberry Bakewell Tart (serves 8)

Raspberry Bakewell Tart by The Fat Foodie

Raspberry Bakewell Tart by The Fat Foodie

Judging from last week’s sneak peek of what to expect from The Great British Bake Off, I think that this week the contestants’ technical challenge sees them making a bakewell tart. I’ve never made a bakewell tart before because I always find them a bit too almondy for my taste. I hate the strong overpowering taste of fake chemical-based almond flavouring that pervades in shop-bought bakewells, so I was a bit reluctant to make one this week.

However, after giving it some thought I decided that my favourite parts of a bakewell tart are the sweet, crisp shortcrust pastry shell and the layer of raspberry jam that lines its base. I decided therefore, to omit the use of almond flavouring, but still use the ground almonds in the filling mix to retain the moisture level and texture, and make a raspberry bakewell tart instead.

My experiment worked well, rewarding me with a generously filled biscuity tart shell which was filled with a light ground almond based sponge which was delicately flavoured with raspberry. To me, this natural-tasting raspberry bakewell tart was far more satisfying than a fake-tasting bakewell. I also added the zest and juice of half a lemon to lift the flavour of the raspberry and make it taste even fruitier. This resulted in a substantial, but fresh, tart which more than satisfied my sweet tooth.

Ingredients:

For the pastry:

175g gluten-free plain flour (I use Dove’s Farm G/F flour because it’s made with low FODMAP ingredients whereas many other gluten-free flours are made with high FODMAP options.)

40g sugar

75g cold butter (or non-dairy version)

2-3 tbsps cold water

For the filling:

3 tbsps of raspberry jam

125g melted butter (or non-dairy version)

125g sugar

80g ground almonds

1 egg

1/2 a tsp of raspberry flavouring

The zest and juice of 1/2 a lemon

To decorate:

15g flaked almonds (to decorate)

80g icing sugar

2 tsps of icing sugar

Method:

Line the base of a 20cm/8in flan tin with greaseproof paper.

To make the pastry:

Put the flour and sugar into a bowl and rub the cold butter into the flour with your fingertips until it has the texture of breadcrumbs. Slowly add the water until it forms a dough.

Lightly flour your work surface and then roll the dough out. Line the tin with the pastry and then put it into the fridge for 30 minutes to chill.

Preheat your oven to 200C/180C fan/400F/Gas mark 6.

Line the inside of the pastry case with foil and fill it with baking beans.

Tart Cases by The Fat Foodie

Tart Cases by The Fat Foodie

Bake for around 15 minutes and then take the beans and the foil out and put back into the oven for another 5 minutes to finish cooking the base.

Once crisp, remove from the oven.

To make the filling:

Spread the raspberry jam over the base of the tart.

Melt the butter in a large microwavable bowl and then add the sugar, ground almonds, egg, lemon zest and juice, and raspberry flavouring and mix well. Pour the filling into the tart and sprinkle with flaked almonds.

Bake for around 35 minutes. If the top of the tart starts browning before the interior is cooked, cover it loosely with foil.

Once the cake is cooked remove from the oven and leave to cool completely.

In a bowl, mix the icing sugar with a small amount of water until it is a thick liquid consistency.

Once the tart is cold, drizzle the icing over the top.

Raspberry Bakewell Tart by The Fat Foodie

Raspberry Bakewell Tart by The Fat Foodie

Digiprove sealCopyright protected by Digiprove © 2016

Mary Berry’s Scotch Pancakes

Mary Berry's Scotch Pancakes made by The Fat Foodie

Mary Berry’s Scotch Pancakes made by The Fat Foodie

Every year at the height of summer my village holds a street fair in which the main street is lined with stalls which groan under the weight of books, bric-a-brac and baking. Although everyone flits around the stalls looking for bargains and purchasing junk they’ll pay an exorbitant price for, but will never actually use, they all end up at the Scottish Women’s Rural Institute table.

I’m going to let you into a little secret here, a secret which these women covet and rarely acknowledge to outsiders, but I know to be true. They have magical powers. Most of these women are elderly and hold life-long secrets to the best home baking. However, they also have the uncanny ability to produce the lightest, airy, pillowy soft, vanilla-scented perfect little rounds of scotch pancake using a portable camping stove on top of a rickety church hall table in the middle of Main Street on a hot summer’s day.

Aside from their coven’s unearthly good scotch pancake-making abilities, they also have the skill to enchant their stall to ensure that on this sunny day of festivity, no wasp, fly or honey bee will bother them. Nor will they bother the jars of homemade preserves the women concocted the previous autumn from the bounty of wild brambles which creep along the hedgerows and are brought along on street fair day to pour atop the little enchanted scotch pancakes they sell to their customers for a small fee.

It’s possible my imagination has embellished the seemingly magical skills of these women. It’s not possible however, that I’ve in any way embellished the tastiness of their scotch pancakes. And just in case I’m right about the true supernatural nature of the women who are members of the Women’s Rural, you won’t catch me being disparaging about them within their earshot. I’d also guarantee that, judging from the wicked little twinkle in Mary Berry’s eye whenever I see her on TV, she’s bound to be a member of her own coven of baking witches. The sheer otherworldly tastiness of Mary Berry’s scotch pancakes also assures me that my suspicions regarding her otherworldly baking abilities are correct.

Now, if you’ll excuse me, I’m late for a meeting with a group of women you really wouldn’t want to get on the wrong side of and I’ve still got some chores to do before I leave. After all, my broomstick’s not going to sweep the floor itself, is it?

Ingredients:

300g gluten-free self-raising flour (I use Dove’s Farm G/F flour because it’s made with low FODMAP ingredients whereas many other gluten-free flours are made with high FODMAP options.)

1½  tsps. baking powder

60g sugar

2 eggs

200ml lactose-free milk (I used rice milk)

2 tbsps. vegetable oil

Method:

Sieve your dry ingredients into a large jug and then add the egg and milk. Whisk well until a thick batter is created. (You may need to add a little bit more milk if the consistency isn’t what you think it should be.)

Put a griddle pan or a large frying pan on a low to medium heat and then add a very small amount of butter.

Once the butter is melted pour a few tbsps. of batter onto the griddle, but try to pour it on one spot so you get a perfect circle of batter. If you’ve got a large enough griddle you can pour more pancakes to cook at the same time, but if not then just cook them one by one.

Let your pancake cook for a while. When bubbles begin to appear on the top of the pancakes you can flip them over to cook the other side.

When your pancakes are light golden brown and springy to the touch they’re ready.

Spread with generous quantities of real butter and jam and enjoy while still slightly warm.

Save

Save

Mary Berry's Scotch Pancakes made by The Fat Foodie

Mary Berry’s Scotch Pancakes made by The Fat Foodie

Save

Save

Save

Save

Save

Save

Save

Save

Save

Save

Save

Save

Digiprove sealCopyright protected by Digiprove © 2016

Custard Creams (makes 8-10)

Custard Creams by The Fat Foodie

Custard Creams by The Fat Foodie

Last Wednesday night was filled with joy for me because it heralded the return of The Great British Bake Off. I love Bake Off. I love its huge tent that I imagine must be filled with tantalising aromas of delicious bakes cooking all day long. I love its two hilarious presenters. I love its good cop/bad cop judging duo that is Mary Berry and Paul Hollywood. But most of all I love watching the bakes that the contestants produce and the acknowledgement that sometimes a bake just simply doesn’t go to plan, however much you practice it. I think that, ultimately, it’s a show that reminds us that it doesn’t mean you’re a total failure if you make the odd mistake. But, maybe I’m overthinking it. Maybe it’s just a show about cake.

This week the Bake Off bakers were faced with the challenge of making biscuits so I thought I’d share one of my favourite biscuit recipes with you. It’s a recipe for custard creams that I used to make with my Mum when I was a kid. Shop-bought custard creams never fill me with much joy. They’re too boring (being a stalwart of the biscuit tin when I was a kid) and rarely have the rich buttery, creamy taste that my adult palate has come to expect from a decent biscuit nowadays. However, these homemade custard creams are a different story from pre-packaged biscuits altogether.

The inclusion of Bird’s Custard Powder, with its fine-textured vanilla flavoured cornflour base, results in an incredibly crumbly and delicately textured biscuit while the use of real butter adds a sweet richness that could never be imparted through the use of margarine or baking fat. I like to add a little less plain flour than most custard cream recipes ask you to use, substituting the loss with cornflour. This results in melt-in-the-mouth buttery, crumbly biscuits sandwiching a sweet, light buttercream filling. In my opinion, they’re sheer perfect biscuit heaven.

This custard cream recipe is unbelievably quick and easy to make, especially if you chuck all of your ingredients into a food processor, but if you don’t have one it’s really easy to make them by hand. Either way, they’re well worth giving a go.

Ingredients:

For the biscuits:

100g butter (or non-dairy version)

80g gluten-free plain flour (I use Dove’s Farm G/F flour because it’s made with low FODMAP ingredients whereas many other gluten-free flours are made with high FODMAP options.)

20g cornflour

50g custard powder (I’d recommend using Bird’s)

50g sugar

1/2 tsp vanilla extract

For the filling:

150g icing sugar

75g butter

1 tsp hot water

Method:

Preheat the oven to 200°C/180°C fan/gas mark 6.

Line a flat baking tray with greaseproof paper.

Mix all of your ingredients together in a food processor or mixing bowl until it forms a ball.

Take heaped teaspoons of the biscuit mix and roll them into balls before placing them on the baking tray with a good space between each of them. (Don’t worry if you’ve got an unequal number of biscuits at the end, you’ll just need to eat the odd one out. It’s a hardship, I know.)

Flatten them slightly and then use the tines of a fork to make an impression on the top of them.

Bake for 10-15 mins or until they are lightly golden brown.

While they are baking, mix all of your icing ingredients together until blended.

Once the biscuits are cooked, let them cool and then sandwich them together with the buttercream icing.

Try not to eat too many at once.

Custard Creams by The Fat Foodie

Custard Creams by The Fat Foodie

Digiprove sealCopyright protected by Digiprove © 2016